I swear I don't
try to avoid my blog. It just happens. One day I don't post, even though I mean to, and then the next four (five, six...) days are busy, and not before too long I have lost all will to post because I am that far behind. That's how I feel now. Actually, within the last 15 days [that's how long it has been since I've posted...ugh] I considered that maybe I shouldn't blog anymore, maybe it wasn't for me after all.
But I've come around, and I will continue to pursue blogging for the time being. I have too much to share in this post though to catch up on all that's been happening.
Remember how I wanted to make it through November before celebrating Christmas, giving November all its necessary honor and respect? Well, that didn't quite happen. I thoroughly enjoyed November and the Thanksgiving season, and it really was a perspective-changing time for me. But once we got back from visiting our families in Michigan over Thanksgiving weekend, we immediately got out our tree and those Christmas boxes that have been calling my name for weeks now, and we
decked the halls, turning this place into a Christmas wonderland. Oh, it makes me so happy! ... every decoration, every Christmas light, every present wrapped beneath our tree waiting for its recipient to open it. Oh, Christmas, I love you.
I talked previously about a Christmasy project I had been planning and working on as a surprise for Mr. Allen's family. I had meant to share it with you all way before December 4, but alas - I think I should follow through with it eventually. Better late than never, right?!
So here it is, my new advent calendar:
It sort of has bunting-mixed-garland style look. I designed the whole concept from scratch, so there's no inspiration that I will forget to link to, just my own mind. I am really proud of the whole creative process, since it was finally my own.
Here's a quick tutorial of how it all happened.
Step one: Gather materials. I found this awesome, green and white striped fabric at Goodwill. It used to be a curtain, and then it sat in my fabric stack for a while, waiting for good use. How perfect was it for this project? (And it was, by far, the cheapest fabric ever. I think the whole sheet/curtain [3-4 yards] was $2.) I used twine (via Joann's), hot glue (I finally have a glue gun of my own), and a red ball trimming (via Joann's).
Step two: Pick your size, shape, and overall design. Here are the plans I drew up when I was thinking of this project and deciding on the measurements.
[The big-picture design for my calendar.]
[What became my template for cutting all the squares. I left 1/4 inch seam allowance.]
[The pile of squares... so many. Keep in mind though, I made 2 advent calendars - one for our home and one for our family. So I needed 96 sqaures in all.]
Step three: After cutting all the squares, I pinned them in pairs front-to-front for what would become little pockets when sewn. I forgot to take a picture of this step.]
Step four: [Apply these next few steps multiple times, one per pocket ... 48 to be exact if you're making two.] I sewed back the top of each side to create a finished edge.
Step five: Then I repeated with the other side, folding away from the front of the fabric. [You can see the finished edge of the first side where the red stitching is.]
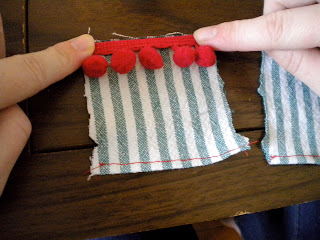
Step six: Cut trimming amount to fit the pocket. Then line it up with the bottom side of the pocket (toward the front of the fabric.)
Step seven: Stack the other piece (front-to-front) keeping the trimming in line with the bottom. You may want to pin this to keep it in its place.
Step eight: Stitch the bottom, securing the trimming between the two pieces.
Step nine: Sew the sides of the pocket. [The top should still be open.]

Step ten: Turn your pocket right-side-out and enjoy. [Ugh, this is not my prettiest pocket.]
Once all the pockets are sewn, simply hot glue a looooong piece of twine to all 24 pockets. I spaced my pockets about 2 inches apart.
Then comes the fun part. This advent calendar is full of festive activities. Each day there is a little something-to-do to get more and more in the holiday spirit. I cut little cards from cardstock (read: old thank you cards from the wedding) and wrote the activity inside and the day-number outside. Each pocket holds one card, and once the card is read on that day, it hangs out of the pocket, adding a visual of how long until Christmas is finally here!
Here is our advent calendar, hung by the window (which should really have some lights up... I'll get to that soon... I think.) We're 4 days in and loving it. Mr. Allen has opened each day's card and most of them will be surprises for him. Today's was to hang up and enjoy the mistletoe. :] ...it's an all-day type of an activity.
Here is a picture of Mr. Allen's family's advent calendar, hung on the mantle. I think they are really enjoying it too! [I sure hope so at least.]
For ideas of how to fill your advent activity calendar, visit
here and
here and
here.
Some other advent calendar ideas that I've liked: wrapping Christmas books up then reading one each day or wrapping up board and card games and playing one each day. I'm sure some day down the road, when the little one(s) are a little older, these will come into play in our family.


